Understanding Barcode X serial numbers
Understanding Barcode X serial numbers
Serial numbers in Barcode X can be a bit tricky to get your head around. You might open up your Barcode X software for the first time and be completely baffled by what to do. We created a support database on our Peninsula-group website ( https://www.peninsula-group.com ) to help with some of your queries you may have about our Barcode X software, and if your questions are not answered on the support page there is an email icon at the bottom of the page where you can send our tech support any questions you may have. we recently added two new support pages in Barcode X showing you how to create a barcode from CSV files and also explaining about serial codes and what to do on the number tab (2nd one along on the top of the 2 tab rows) in Barcode X. We at Peninsula thought understanding all the boxes when your in the number tab in Barcode X might be a little confusing at first so we thought we would explain it all right here for you.
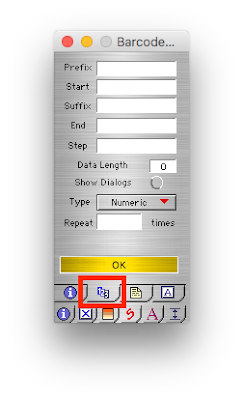
First off we begin by opening up our Barcode X software and navigating to the number tab which as we said previously is the 2nd tab along on the top if the 2 tab rows see the image to the left. The dialog should look exactly like the image on the left. See the many different fields to fill in with words like Prefix, Suffix and Dialogs, you might not even know what those words even mean let alone what data to input into each field and drop down menu. So here in this blog post we will take each individual field and go through what data you might need to input and were you would need to look to find that out.
To begin with we need to state that serial numbers have various components and in this post we will explain the various parts to the numbers and were to input the correct numbers into the correct fields. Please also note any code we may use to explain things to you will be an example and your code will be made up differently.
The first field you will see on the dialog will be the Prefix box. The prefix field is for if a "JS" appears before the beginning of a serial number. If a "JS" appears before your serial number you would then input JS in the prefix field.
The second field you will encounter on the dialog will be the start field. The start field is for if the serial numbers go from 1 to 199. So if your serial number goes between 1 and 199 then you should enter 1 in the start field.
The third field you will see on the dialog will be the suffix field. The suffix field is different to the prefix field in that if "AB" appears at the end of each serial number then you would enter an AB in the suffix field.
The fourth field you will encounter on the dialog will be the end field. The end field is like the start field but instead of entering a 1 into the field, if the serial numbers go from 1 to 199 you would enter a 199 in the end field. So if your serial numbers go from 1 t0 199 enter a 199 into the end field.
The fifth field you will see on the dialog will be the step field. This field will be for if the serial numbers of 1, 2, 3, 4, 5 for step size of 1. Or if it uses a step size of 10, it would go 10 , 20, 30, 40. So in the step field you would input the step size number that your serial numbers use, for this example we would input 1 into our step field, and this would say our serial numbers go up by one each time.
The sixth field you will see is the data length field. The data length field sets the number of digits output as a serial number. This includes the prefix and suffix that we entered in the earlier fields. Some barcodes will not allow you to alter this length as they have fixed lengths, some barcode will let you alter the length however. If a serial number is less than the data length, it will automatically insert leading zeros to maintain the length.
we will give you an example. If we entered 12 in the data length field. The data together should return the first serial number as JS00000001AB . See that the number generated has 12 digits this is because we inputted the data length to be 12. As the serial number was less than the data length the zeros were inputted to make it reach the data length.
The seventh field you will see on the dialog is the show dialogs field. The show dialogs field is for if you want to run the automatic dialogs on or off. The dialogs appear when you click on a barcode to make it. Window will pop up asking you where you want the barcode to be saved and what you want to call it. So if you have already predetermined were your barcodes will be saved you can choose to click the dialog button to stop the dialogs showing each time a barcode is generated. For example if you are generating 100 barcodes you wouldn't want 100 dialogs popping up asking you to save each individual barcode, as this would be a frustrating process.

The eighth field you will encounter on the dialog is the Type dropdown menu. The type dropdown menu is for if your barcode is numeric or alphanumeric. Some barcodes and text items are not only numeric they can be instead alphanumeric. This means that they not only have numbers but also letters making it a combination of the alphabet and numbers. Hence the name alphanumeric. The Type drop down menu allows you to choose whether an item in a serial number is numeric or alphanumeric.

The ninth field you will see on the dialog is the repeat field. The repeat field is the final box on this tab page. This is only relevant when you are wishing to print serial numbers directly from within the application. The field allows you to enter a number which, when set will allow the serial number to stay for a certain number of labels. This can be particularly useful when using batch numbers. For example with batch numbers the numbers may only need to increase every 20 labels, so you would input in the field 20. Then the serial code would change every 20 times.
If you still encounter any issues or problems with your Barcode X software please email our Technical Support at tech@peninsula-group.com .


No comments :
Post a Comment